Step 1: Log in to your ABC account
Step 2: Input or edit your store information
Settings > Store Info
Enter your store details and upload your logo by dragging the file or selecting it from your device.
Step 3: Save your information and Restart the POS
All information will be updated after restarting the POS system.
How to log in to your account on the POS machine
Tax Rates and Payment Settings
Step 1: Find Tax Settings Under Store Info
After logging into abc Dashboard, Go to Settings: Store info. Choose the branch you want to make changes to.

Step 2: Find Tax Settings after selecting a branch.
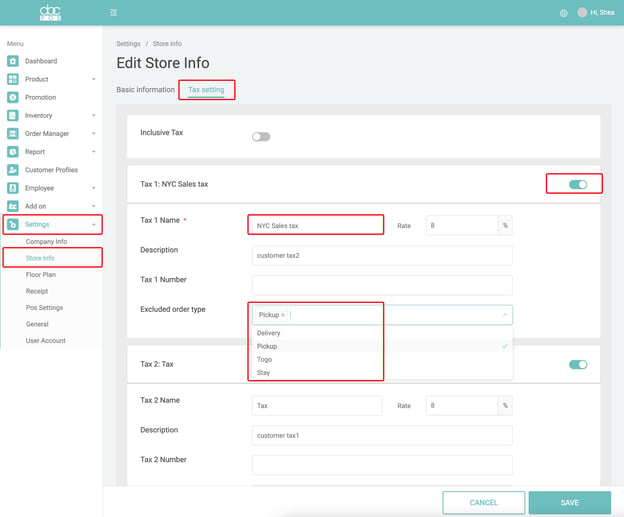
Click the Tax Setting tab to see the Tax Setting.
1. The first section of Tax Settings: Inclusive Tax: When it’s on: All the menu item price will be tax inclusive
2. The Second Section of Tax Setting: Tax Name & Rate
- Tax 1 Name* & Rate - required and will be shown on the sales receipt
- Excluded Order type: select from the list if there is an exclusive order type.
- Make sure the tax active button is “on”
- Click “Save”
Step 3: If you have more than 1 Tax Rate, how to handle multiple taxes?
- Set up the “Tax 2” section and turn it on.
Step 4: How to apply taxes to the product items?
- Go to the Product> Menu Category, check the product-tax dropdown list.
- Also, you can apply to individual menu items. Go to Product> Menu Item, select the taxes in the product-tax dropdown list.
- Apply both taxes to the category or menu item.
- Click “Save”
Step 5. You are all set
After all the items have the correct taxes, you can take orders on the POS and the taxes would be applied accordingly. You can view the total taxes collected in the daily closeout report or in the Overview reports on your Dashboard.