Floor plans in your Square for Restaurants account are there to mirror the physical layout of your restaurant. You can create floor plans for one or more locations — all you’ll need is your Dashboard and knowledge of your restaurant layout.
How to set up a floor plan?
Floor Plans are completely customizable. You’ll first create the different sections of your restaurant, then add the appropriate seating and tables to each section.
Head to your Dashboard to start creating your floor plan:
-
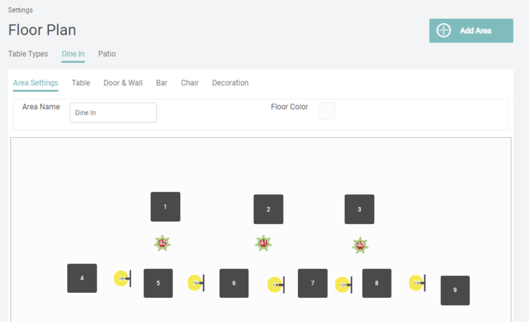
Select the Settings in the left side navigation and click Floor Plan.
-
Choose your restaurant location by clicking on the location name.
-
Select the Area you want to edit or click on Add Area on upper right corner.
-
Under Area Setting, enter in your Area name and choose your background color.
Now you are ready to start adding tables to your Area. Areas represent the different areas within your restaurant, like Dining Room, Bar, and Patio. You can also differentiate between areas in your reporting.
-
Click on a table to add it to your Floor Plan.
-
Once your tables are added to your floor plan, you can click each one to set seat numbers and table number.
-
You can change the size and shape by dragging on the border, rotate the table by clicking on the right corner.
-
To move your tables, drag and drop them around your Floor Plan.
-
Continue to add tables and other furnitures until it mirrors your physical layout.
-
Once your Floor Plan looks right, hit Save.
Floors are used to organize your tables into groups. While you can only work with one floor at a time in the app, it's easy to switch between floors. You can also edit the configuration of floors and tables on-the-go directly in the app.
Tables are used to group orders together. The status of a table is shown on the Tables screen and the Orders List screen.