Learn to manage waitlists, reservations, and customize your queuing system.
Table of Contents
Manage Waitlist & Reservations
Manage Waitlist & Reservations
Add a Walk-In to the Waitlist
- Tap “Add Party”
- Enter customer information
- Tap “Add Party” to add the customer to the waitlist.
Scanning the QR code to join the waitlist
- Find the Customer Site section on the Back Office. Download and print the QR code.
- Scanning the QR code allows the customer to enter their information and join the waitlist. Tap “Join the waitlist” to start waiting in the line.
- After joining the waitlist, the customer can see their position in the waitlist: How many customers are ahead of them, and their estimated waiting time.
- The customer can tap “Edit Info” to update their information.
If the customer has a party with more than 6 people, they cannot join the waitlist by scanning the QR code. They are required to join the waitlist by speaking to the host.
Add a Reservation
- Tap “Add Party”
- Enter Party Size
- Select Date & Time
- Input customer name and phone number
- Add Reservation

Manage Reservations
- Check In: Check a customer in to confirm a customer has arrived. The customer will be marked as “Checked in”, and it will show the customer arrival time.
- Cancel: Remove the customer from the waitlist and mark them as “No show” or “Removed”

- Seat: Seat a customer and mark the customer as “Seated”

- View: View and edit the customer information

Filter Reservations
- Sort by party size group at the top

- Tap the “Search” icon to call out the search bar. Enter the customer name, phone number, or waitlist number to search for a customer in the list.

- In the waitlist, tap the arrow on the top right corner to sort the waitlist by the customers’ arrival time ascending or descending.

- In the reservation list, tap the “calendar” icon to view the reservation on a specific day.

- In History, the customers can be filtered with their status: “Removed”, “No Show”, and “Seated”.
Back Office Queuing Settings
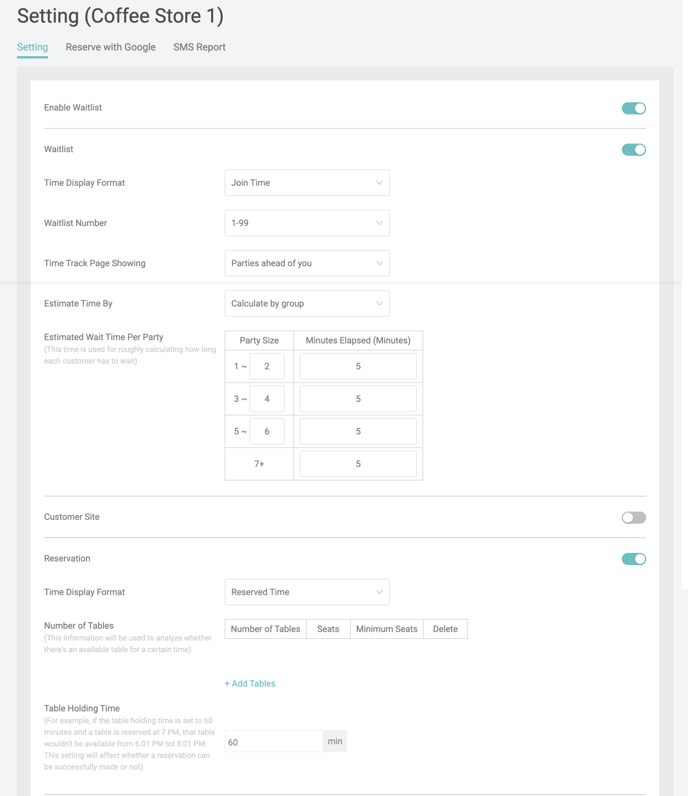
Add on > ABC Queuing > Select branch (if necessary) > Setting
Enable waitlist to access queuing features
- Time display format: Select “Join time” to see the time when the customer joined the waitlist. Select “Minutes Elapsed” to see how long each customer has been waiting for.
- Waitlist Number Range: Choose the range of the waitlist number.
- Time Track Page Showing: When each joined customer checks their waitlist status online, they can see the Estimate Wait Time or Parties Ahead of You
- Estimate Time By: Select how you would like to base the time estimate by (Ex. Calculate by Group)
- Estimated Wait Time Per Party: The average wait time per different table type. (Ex. The average wait time for a 5-person table is 20 minutes)
Customer Site
- Download the QR code to add it to a poster. Customers can scan the QR code to join the waitlist
- Upload Cover Image: This image will show at the top of the customer waitlist site
Reservation
- Time Display Format: Select “Reserved time” to show the time of the reservations. Select “Countdown” to show how long it is left until the reservation time.
- Number of Tables: The number of tables must be set to start using the reservation feature. For each type of table, you need to enter the number of tables, the number of seats for this type of table, and the minimum number of customers allowed for this type of table.
- Table Holding Time: Table Holding Time: This number is used to calculate how long a table is taken for each party. (Ex. If the “table holding time” is set to 60 minutes, when a table is reserved at 7PM, the table won’t be available for another reservation from 6 to 8 PM)

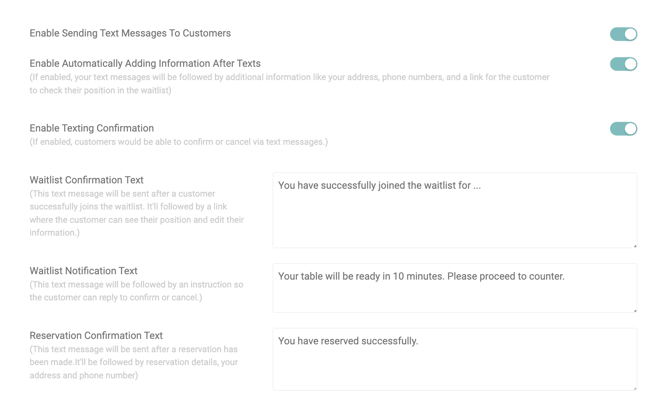
Text Messaging Settings
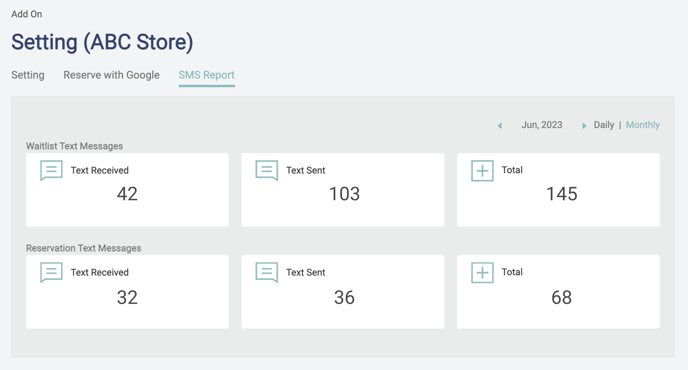
Customize your text communications to customers to ensure a seamless experience. Track how many messages are sent and received under SMS Report


Reserve with Google
Enable Receive reservations from Google to access additional settings and set up the service phone number that will be used to communicate with customers
Table Settings
- Table Type: Define different types of tables in your restaurant, according to the size and turnover time of tables
Schedule Setting
- Select which days and what times your restaurant is available for reservations
Special Data Settings
- Customize a date range for reservations during special occasions or holidays
Once the Google reservation feature is live, any Back Office changes to the Google Reservation Settings will not take effect until the next day.
Please feel free to contact our technical support team at 718-321-3888 for assistance or any further questions

