
ABC Queuing provides a great customer experience for customers to join the waitlist by scanning QR code and merchants can easily manage waitlist and reservations on the same tablet.
ABC Waitlist and Reservation
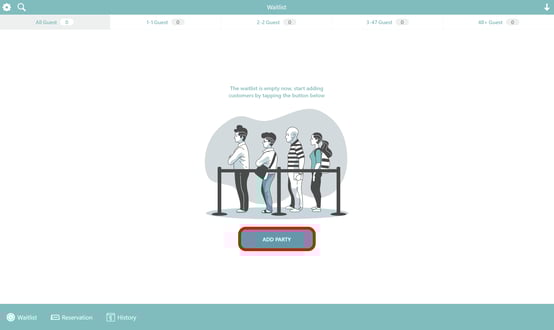
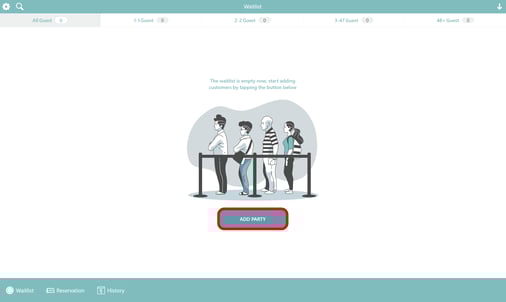
Add a customer to the waitlist
- Tap “Add Party”
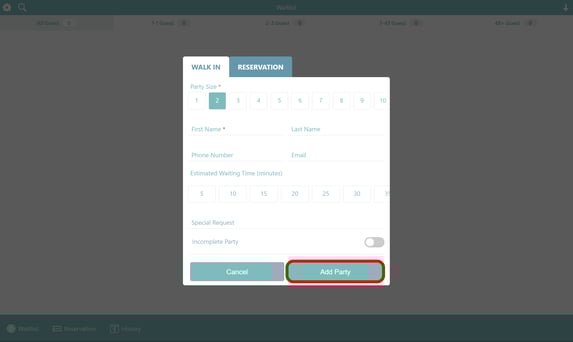
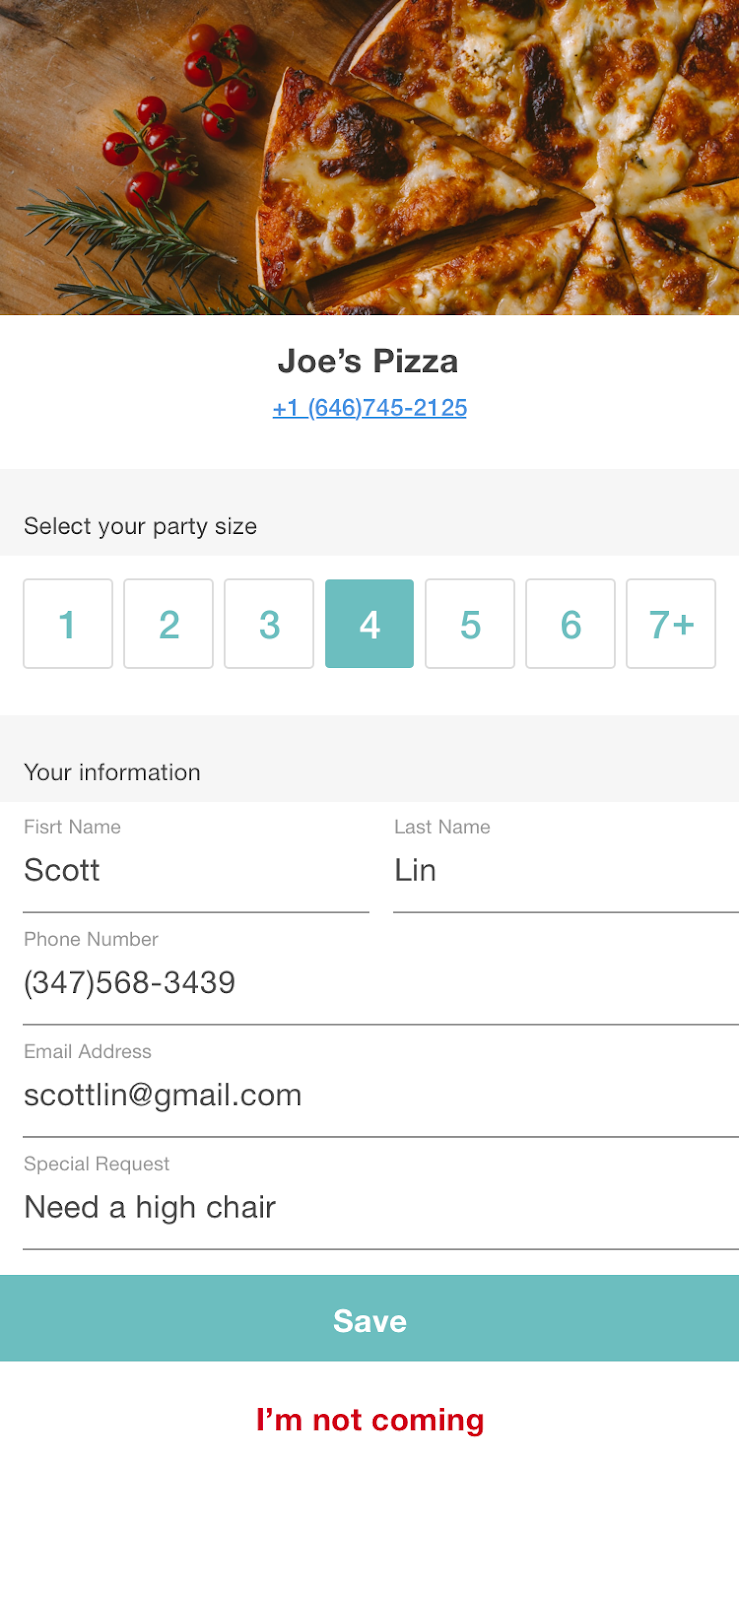
- Enter the customer information. Required information includes: number of customers, customer first name. Optional information includes: customer last name, phone number, email, estimated waiting time, special requests, and whether the customer has an incomplete party.

- After entering the information, tap “Add Party” to add the customer to the waitlist.
Operations on a waitlist customer
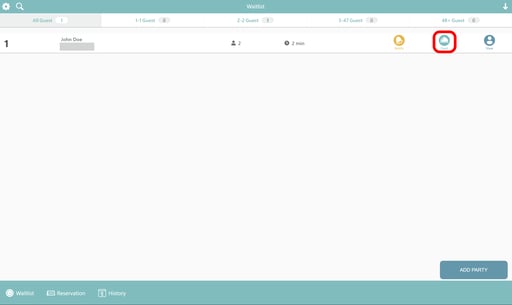
- Notify customer: It will send a notification text to the customer’s phone number. Customers can check the status and mark "CONFIRM" or "I'M NOT COMING" to cancel on the link that they received in the text.
- Cancel: Remove the customer from the waitlist and mark them as “No show” or “Removed”
- Seat: Seat a customer and mark the customer as “Seated”
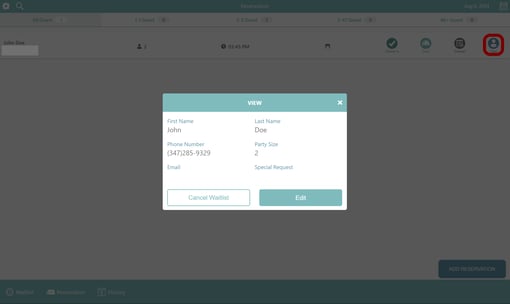
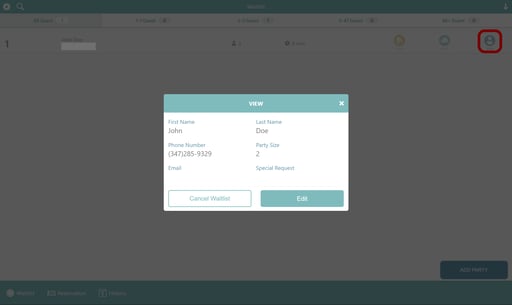
- View: View and edit the customer information
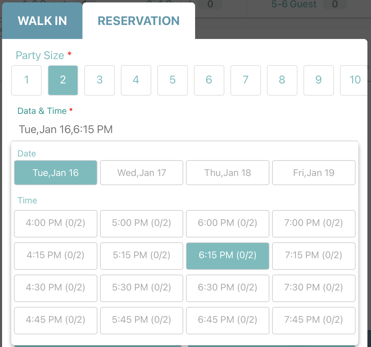
Add a reservation
- Tap “Add Reservation”
- Select the party size and choose the reservation date and time. The system will show the available slots when choosing the date and time based on the number of tables and the table holding time.
- Enter the customer information. Required information includes: customer first name and phone number. Optional information includes: customer last name, email, table number, and special request.
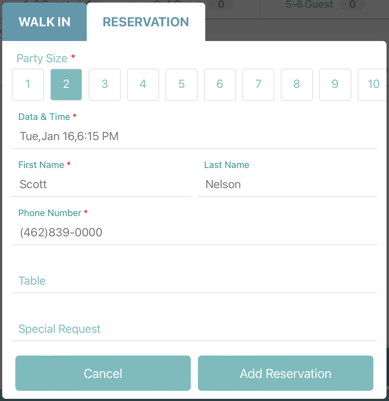
4. After entering the information, tap “Add Reservation” to add this reservation.

Operations on a reservation customer
- Check In: Check a customer in to confirm a customer has arrived. The customer will be marked as “Checked in”, and it will show the customer arrival time.
- Cancel: Remove the customer from the waitlist and mark them as “No show” or “Removed”

- Seat: Seat a customer and mark the customer as “Seated”

- View: View and edit the customer information

View the reservation, waitlist, and history list
- Filter the waitlist, reservation, or the history list by selecting the party size group at the top. It shows the number of customers in each group.

- Tap the “Search” icon to call out the search bar. Enter the customer name, phone number, or waitlist number to search for a customer in the list.

- In the waitlist, tap the arrow on the top right corner to sort the waitlist by the customers’ arrival time ascending or descending.

- In the reservation list, tap the “calendar” icon to view the reservation on a specific day.

- In the history, the customers can be filtered with their status: “Removed”, “No Show”, and “Seated”.
Scanning the QR code to join the waitlist
- Find the Customer Site section on the Back Office. Download and print the QR code.
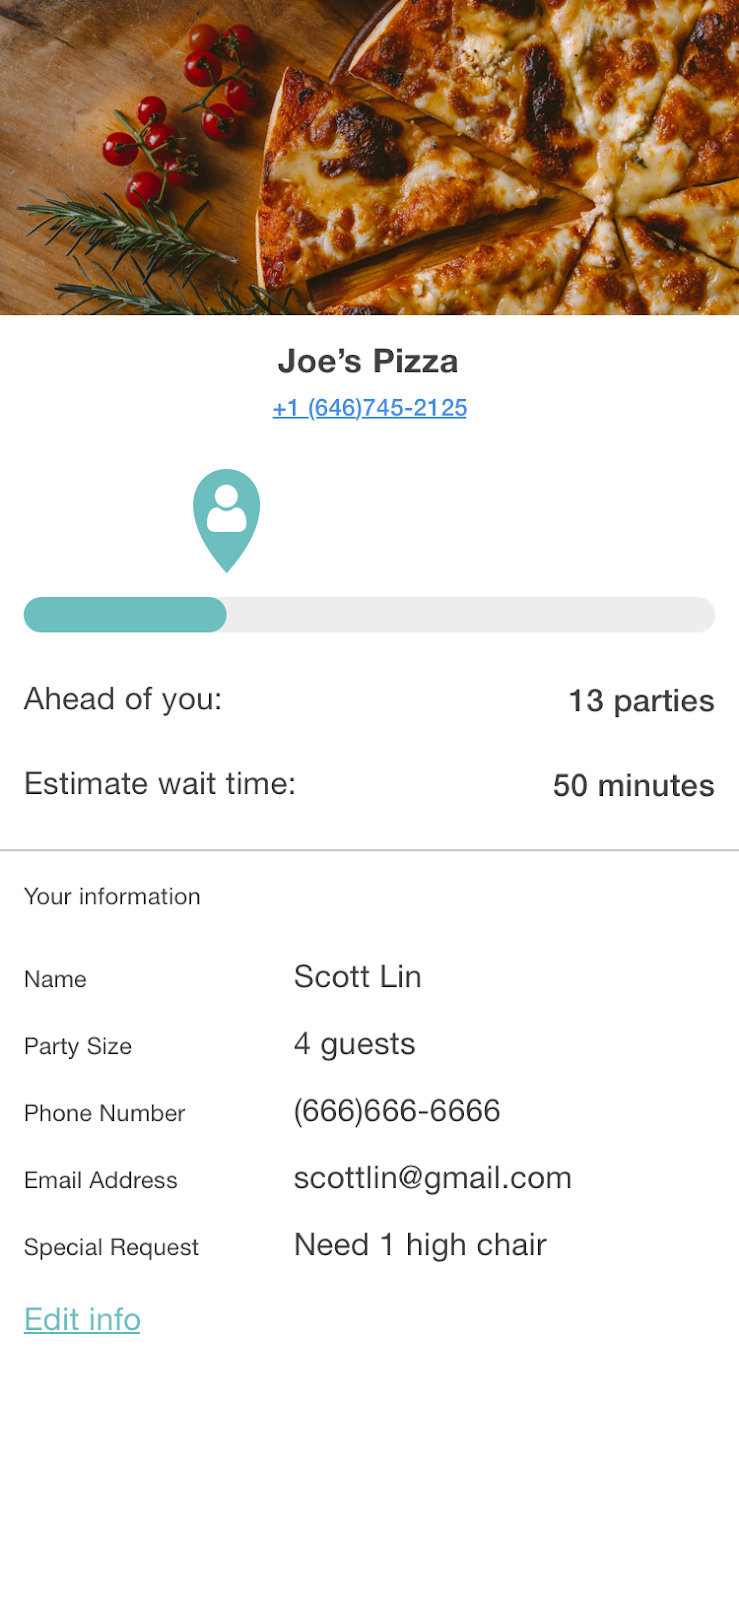
- Scanning the QR code allows the customer to enter their information and join the waitlist. Tap “Join the waitlist” to start waiting in the line.
- After joining the waitlist, the customer can see their position in the waitlist: How many customers are ahead of them, and their estimated waiting time.
- The customer can tap “Edit Info” to update their information.
- If the customer has a party with more than 6 people, they cannot join the waitlist by scanning the QR code. They are required to join the waitlist by asking the host to add them on the Host Pad.

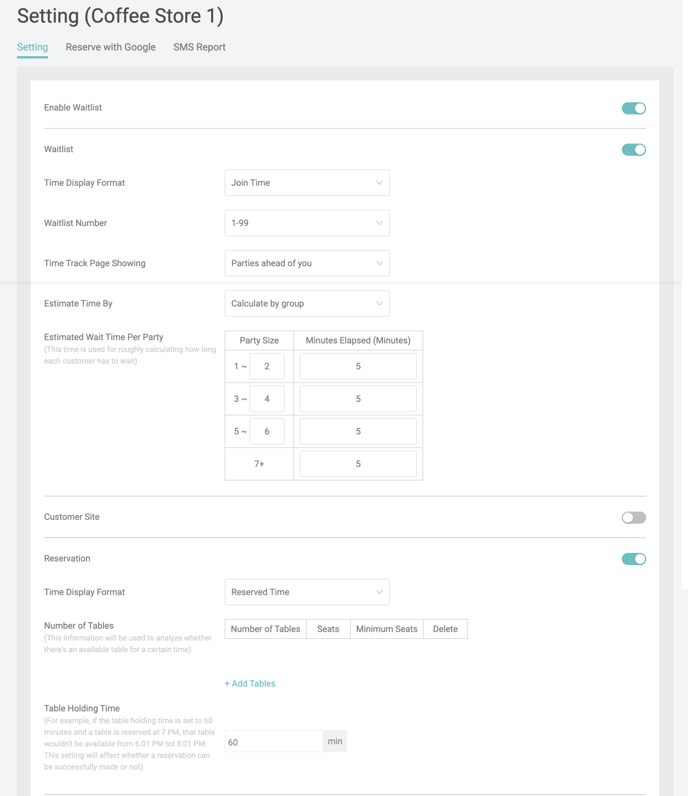
ABCPOS Queuing Settings
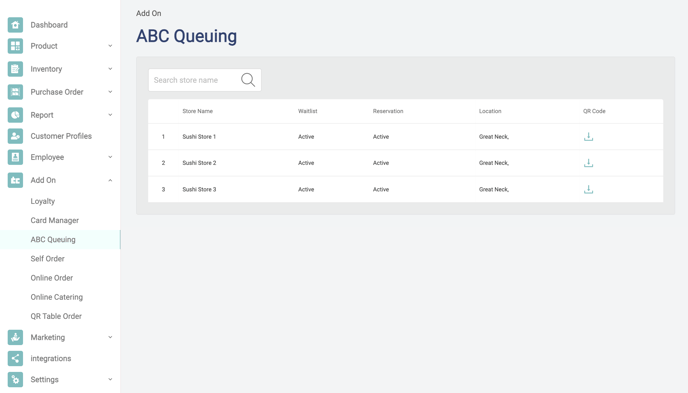
- Log into the Back office, go to Add on > ABC Queuing. Choose a branch and start the settings for ABC Queuing system.
- Party Size Groups allow the user to set filters for waitlist groups. You can set at most 4 groups (for example, 1-2 guests, 3-4 guests, 5-6 guests, and 7+ guests).
- Time Display Format: Select “Join time” to see the time when the customer joined the waitlist. Select “Minutes Elapsed” to see how long each customer has been waiting for.
- Waitlist Number: Choose the range of the waitlist number. For example, when “1-99” is chosen, the waitlist number will end at 99 and start from 1 again.
- Time Track Page Showing: When each joined customer checks their waitlist status online, they have two options: 'Estimate Wait Time' and 'Parties Ahead of You' These settings can be configured accordingly.
- Estimated Wait Time Per Party: Its accurate meaning should be 'average wait time per different table type.' For example, for a 5-person table, the average wait time is 20 minutes. So, the first person waiting will be displayed as needing to wait 20 minutes, the second person 40 minutes, the third person 60 minutes, and so on.
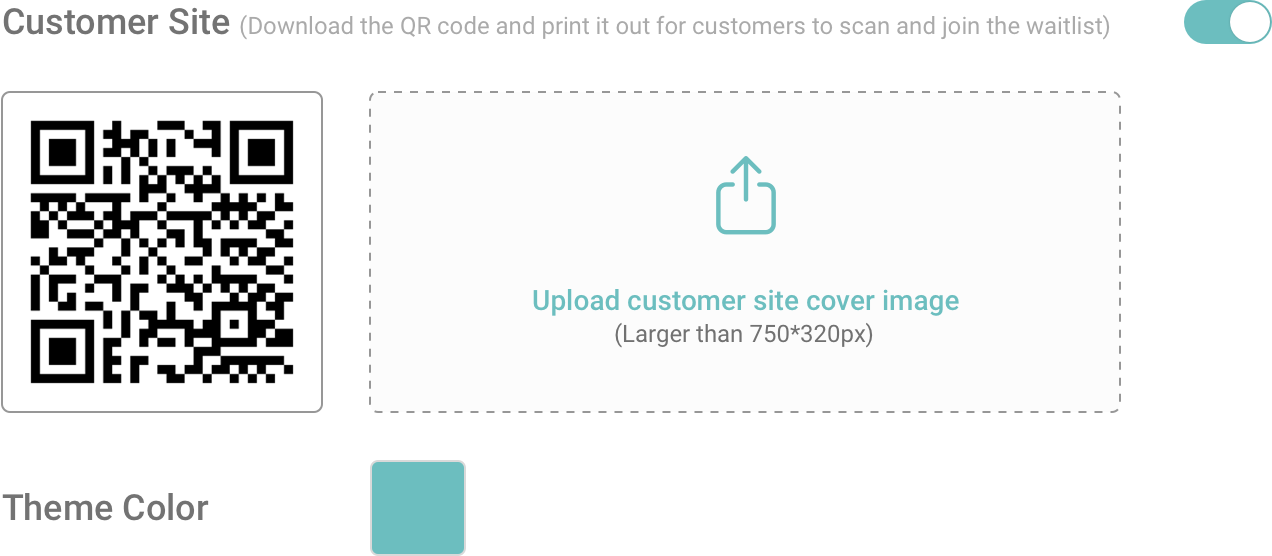
- Customer Site - QR Code: You can download the QR code and add it to a poster to print it out. Then, the customers can join the waitlist by scanning the QR code.
- Customer Site - Cover Image: Upload the image to show at the top of the customer site. You can customize the site for the branding of your business.
- Customer Site - Theme Color: For the branding of your business, select a color to be the main color of your customer site.
- Reservation Additional Info: Select “Reserved time” to show the time of the reservations. Select “Countdown” to show how long it is left until the reservation time.
- Number of Tables: The number of tables must be set to start using the reservation feature. The number of tables is used to calculate whether a table will be available when a new reservation is added. For each type of table, you need to enter the number of tables, the number of seats for this type of table, and the minimum number of customers allowed for this type of table.
- Table Holding Time: This number is used to calculate how long a table is taken for each party. For example, if the “table holding time” is set to 60 minutes, when a table is reserved at 7PM, the table won’t be available for another reservation from 6 to 8 PM.
Text Messaging Settings
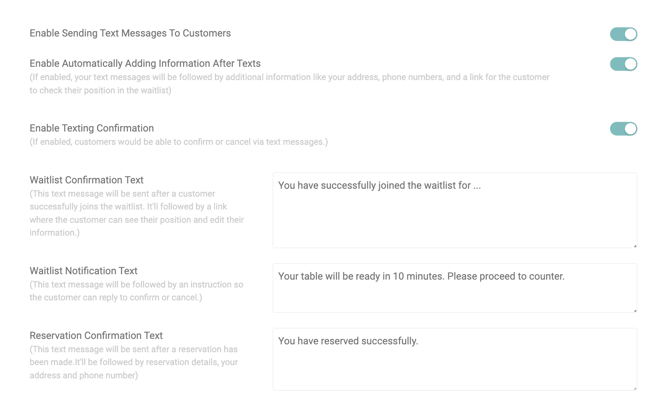
- Turning on/off “Enable Sending Text Messages To Customers” to enable/disable sending text messages to the customers.
- Turning on/off “Enable Automatically Adding Information After Texts” to enable/disable additional information in text messages. For waitlist text messages, the additional information would be a link for the customer to open and check their position in the waitlist and estimated waiting time. For reservation text messages, the additional information would be the reservation details including the restaurant address, phone number, reservation time, and the number of reservation guests.
- Turning on/off “Enable Texting Confirmation” to enable/disable the customer replying feature. When it’s enabled, the customer can reply to the notification text to confirm their seats or cancel their position in the waitlist.
- “Waitlist Confirmation Text” is the text message that will be sent after a customer successfully joins the waitlist. It'll followed by a link where the customer can see their position and edit their information. Merchants can customize the text message in the text box.
- "Reservation Confirmation Text" is the text message that will be sent a reservation has been made. It'll be followed by reservation details, your address and phone number. Merchants can customize the text message in the text box.
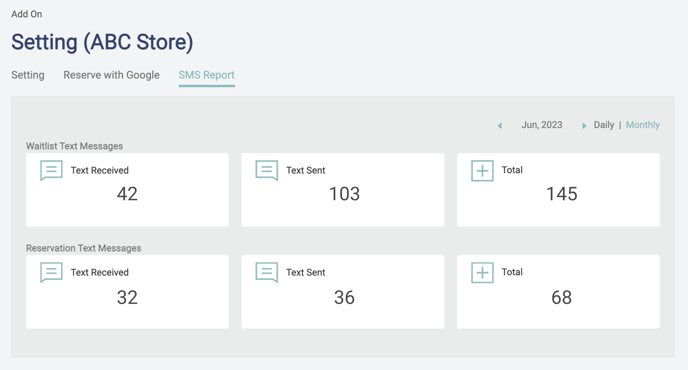
- The user can track how many text messages are sent or received in the SMS report.
ABCPOS X Reserve with Google
Back Office Reserve with Google Settings

Log into the Back office, go to Add on > ABC Queuing > Reserve with Google
Configure relevant setting details
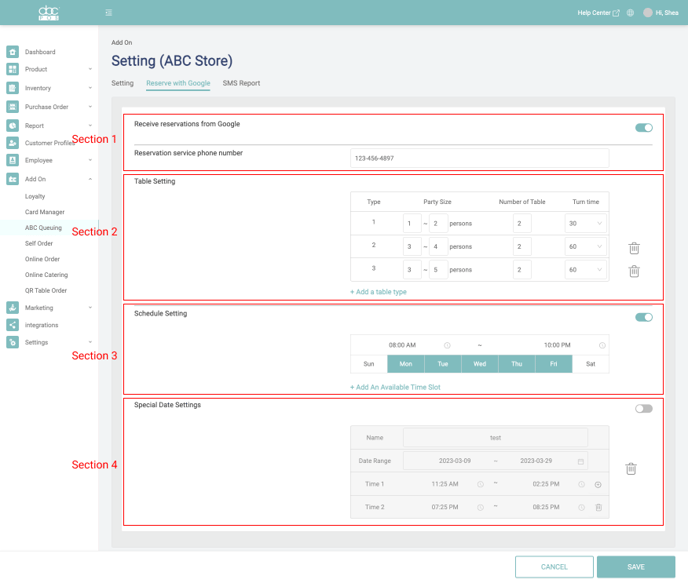
Section 1: Basic Setting
- Receive reservation from Google: turn on this goggle to receive Google reservation
- Reservation service phone number: set up the service phone number that is used for customers to reach the merchant regarding their reservation questions.
Section 2: Table Setting
With the comprehensive Table Setting feature, you can efficiently manage your restaurant's table arrangement, accommodate various party sizes, and ensure a seamless reservation experience for your guests.- Table Type & Add a table type: define different types of tables in your restaurant, according to the size and turn time of tables. Have the flexibility to create new table types on the go. Whether you introduce new seating areas or reconfigure your existing layout, effortlessly update your table settings to reflect these changes.
- Party Size: specify the number of guests each table can accommodate. Whether it's small groups or large parties, google will assign tables automatically based on their capacity to optimize your reservation arrangements.
- Number of Tables: keep track of your total table count. Manage your inventory effectively and ensure accurate availability information for your customers when they make reservations.
- Turn Time: set the time it takes to turn over a table, from when one party leaves to the next occupying the space. Optimize your table turnover rate and provide accurate wait time estimates to enhance your guests' experience.
Section 3: Schedule Setting
The Schedule Setting feature empowers you to efficiently customize your restaurant's availability for reservations. This setting is achieved by setting available time slots, in each time slot you can find:
- Time range: define the time range in the day during which your restaurant is available for reservations. Whether it's breakfast, lunch, or dinner, easily specify the time slots to match your operating hours.
- Weekday range: select days in a week during which the time slot will apply. Too busy to handle reservations on weekends? No worries, simply exclude “Sat” and “Sun” from your selection
Section 4: Special Date Setting
Set up a special date range for unique occasions or events when you want to offer different time availability for reservations. For example, during holidays or promotional events, you can customize the time slots or even block certain dates entirely.
Experience the power of efficient scheduling with our restaurant reservation system's Schedule Setting feature. Start managing your availability effectively and delivering exceptional dining experiences today!
PS: Once the Google reservation feature is live, any Back Office changes to the Google Reservation Settings will not take effect until the next day. If merchants encounter any issues with the Google Reservation feature or want to stop the feature, please feel free to contact our technical support team at 718-321-3888 for assistance.